Showing posts with label process. Show all posts

Saturday, October 20, 2012

The Quilt from H*** claims another victim

Some time ago, our friend, blogless Honna brought a project to White Oak that has become known as The Quilt From Hell.  It's official name was "Simple Gifts" and while it was intended as a gift from her to several friends, it turned out to be anything BUT simple. 


While none of us liked the colors or fabrics in the photgraph, it was pretty clear that it relied for its impact on the contrast among the two framing fabrics, the feature fabric in the center, and the background.  Honna's fabrics (chosen by the recipients) had nearly no contrast at all.  Strike one against her.  She had also been  increasing the size from the generous throw of the pattern to one for a queen bed!   So the numbers of units had about doubled.  Strike two.

The top itself is assembled in units that are put together as diagonal strips.

Most of her time at the retreat had consisted of cutting and sewing together the separate units.  But it was just not going well at all for her.  I spent some time working with her  The biggest problem was the placement of the little triangles, but the only way to complete fix that was to take apart all the segments she'd assembled -- a larger task than she was prepared to undertake.  So we concentrated on how to put together what was already done. Along around Saturday night of the retreat, it became clear that she was just at the end of her rope.  I promptly picked everything up, told her to do something else that she enjoyed, and that I would take it home and get the top together.  A week or so later, I gave her the quilt top.  The lattice didn't "wind" correctly, but the lack of contrast in the fabrics concealed that flaw. 

Unfortunately, as I analyzed what went wrong, I found that I liked the pattern and decided to use it to make the new quilt for D#2's room.  At my request, she fished the book out of her discard pile and gave it to me with her blessing.  My first step was to find fabrics with sufficient contrast, and, in Paducah, I bought these:

After working on a lot of scrap quilts, cutting into these lovely, cheery fabrics, all in my favorite colors has been such a treat!  I have been happily sewing along, preparing all the units (5 more than in the pattern to increase it to the length of a twin bed mattress top) and planning to assemble the top before the upcoming W.O.W. (White Oak Weekend).  There I hope to add borders -- at least one of them pieced -- so I can send it off to be quilted!

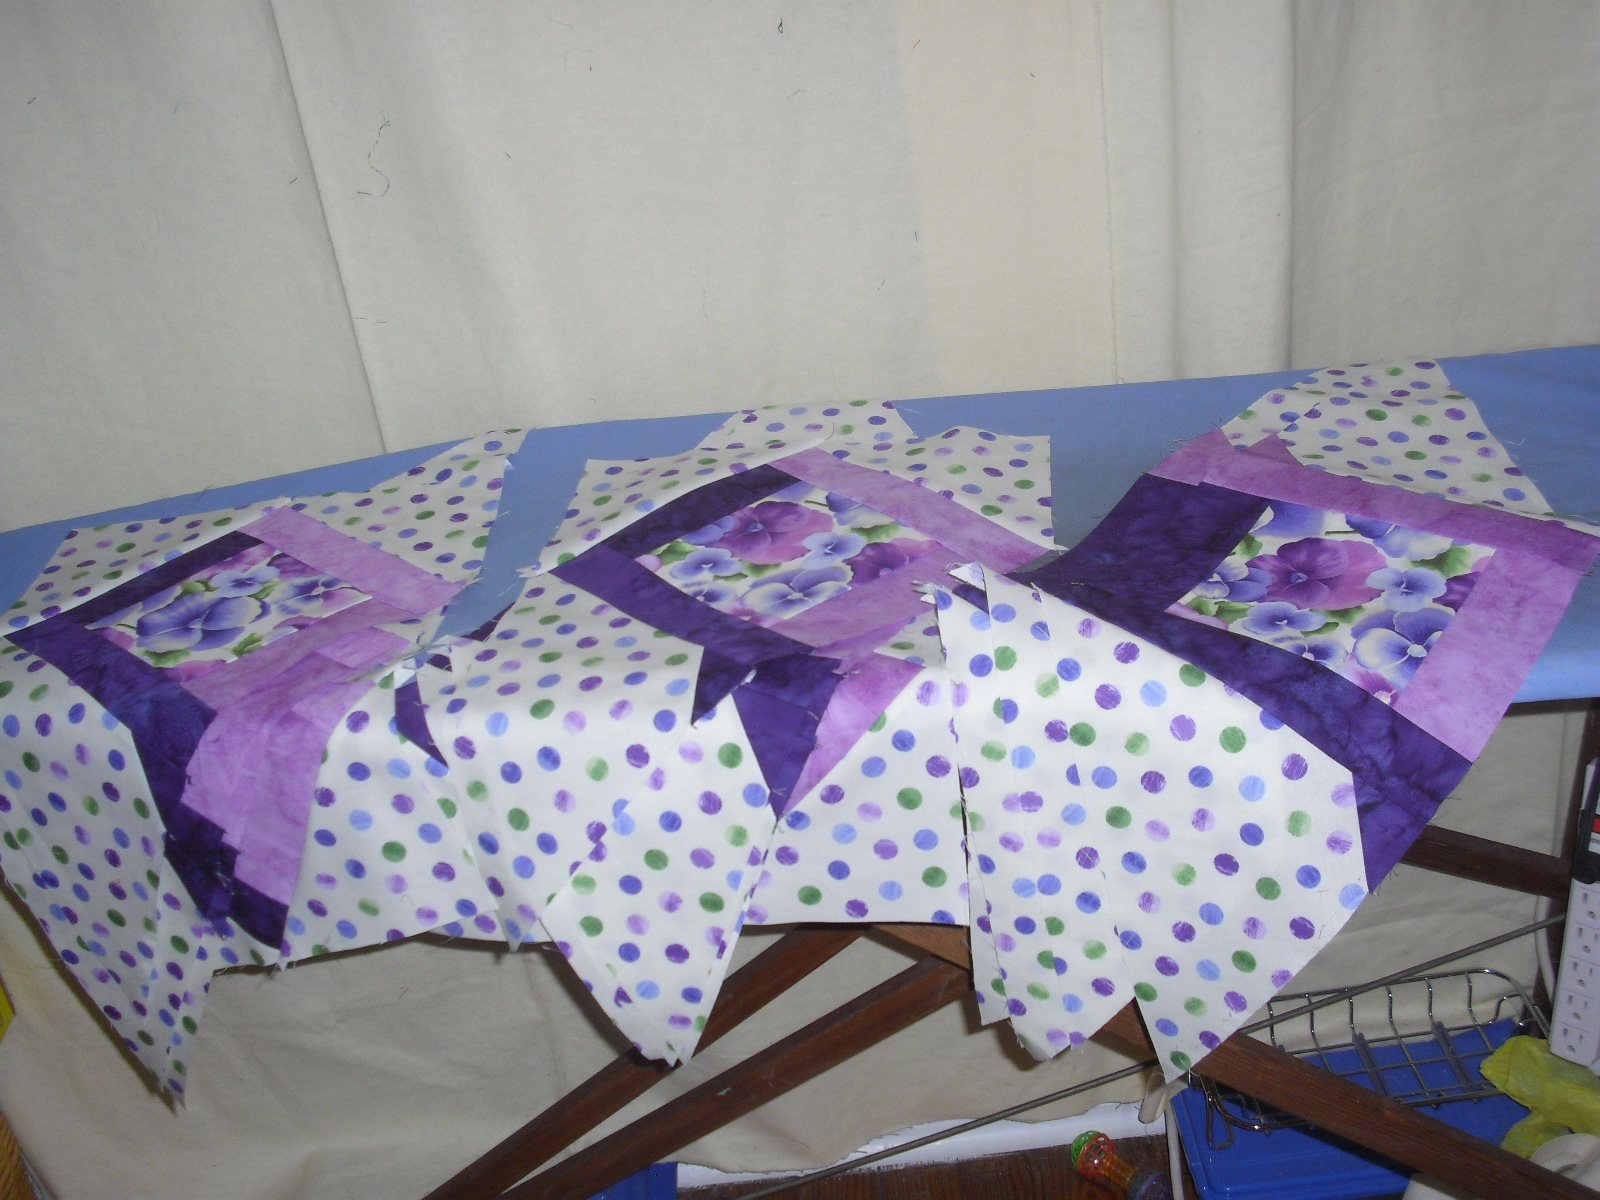
Today I began to put the finished diagonal units together.   Here they are, all spread out and ready to go.

SCREECH.... HALT!!!


Why weren't my lattices winding correctly???   I'd been so careful (or so I thought).  The directions had cautioned that this was wrong:


But somehow I'd found (and used) an equally wrong arrangement:


 The triangles needed to meet here:


Looks like the Quilt from Hell has won the first round from me, too.  Not giving up, though.  I have a lot of "un-sewing" or "frog-stitching" (rippit, rippit) to do before Friday!   Honna....  I know JUST how you feel. 

Tuesday, February 21, 2012

Jelly roll plus

Last fall, Pat blogged about a "technique" called a "jelly roll race".  While it didn't seem like something I'd be much interested in, she brought the two she had made to a group sew-in and they were quite interesting.  Both batiks, the colors seemed to flow nicely across the top. 

Not willing to invest a lot of money in something that felt "experimental", I kept my eyes open for a less expensive alternative and found this mottled rainbow jelly roll -- two strips each of ten colors.  But what really clinched it was this fun fish print that contained all the same colors as the jelly roll, but more vivid, so I bought the only two fat quarters left.


I cut the fish into enough 18" strips to alternate with paired strips and started sewing end to end.

SURPRISE!  Instead of a quilt-proportioned rectangle, I ended up with one that was long and skinny.  Note to self:  using 20 strips (what was in my jelly roll) does not result in the same shape as using 40 (the usual number of strips).  A "duh" moment!


Clearly, something had to be done to rescue the project.  I counted the number of strips across (16) so I frog-stitched (rip-it, rip-it) three seams to result in four sections with four strips in each.


Next, I measured the width of the sections and cut each one into squares so I could arrange them into a more useful shape.  Thanks for the help, Smidgen!


An arrangement of five blocks by five blocks (chosen from the 28 I started with) will result in a top just under 40" square. 


All that is left now is to sew the blocks together.  I will probably not add a border to it, but will eventually quilt it myself for some children's charity.   In conclusion, my findings were that this approach to sewing strips together does make a top quite quickly, even if you don't use them in the original way (but you might need to "unsew").  I did have fun working with the bright cheery colors in the fabrics!

Sunday, January 8, 2012

A 2012 mystery [quilt]

Looks like my friend Pat beat me to posting about the mystery quilt we're doing together.  As she explained in her post, it came about because she gave me a subscription to a magazine and my first issue contained this 3-part mystery. 


Nice addition is/was the fabric choices of several magazine staffers. I also like that alternatives are given for two sizes.  Pat is making the larger version; I've chosen to do the smaller (72" x 72" so it's still practical). 


I have never done a mystery quilt (though I once agonized fifteen ways about fabric choices when I thought I was going to attend a mystery quilt retreat).  Also one of my goals is to try to be less anal-retentive controlling and to stretch outside my comfort zone.  So, I suggested to her that we do this together.   Pat's post outlines the instructions for fabric choices and shows her bright, cheery choices.  Here are mine:


While I do love paisleys, the one I chose (far left) is in not-my-usual colors.  The aqua is in my "normal" pallette, so the aqua & brown "tiles" (far right) are also predictable, but I'm not a brown person at ALL, nor do I tend toward sage-y greens.  Since those two are (based on yardage) the most prominent colors, I'm stepping out of my usual blue/purple/aqua or "bright color" boxes.   I've cut and have almost finished sewing the first units:


Looking forward to the next installment in the upcoming issue! 

Wednesday, September 21, 2011

Taking a class with a friend

Spent Friday looking at the quilts, combined with a session of S.E.X. (that's Stash Enhancement EXpedition for the uninitiated) at the modestly-titled "Pennsylvania National Quilt Extravaganza."   On Saturday, my friend Pat and I took a class with John Flynn who has his own method of making a Double Wedding Ring quilt.  The DWR demands attention, precision and respect because of the many pieces in the arc and the curves!    


When I signed up for the class, I knew I wanted to work with rainbow colors, in batiks because .... well, because I love clear, bright rainbow colors and batiks and had never used them in a project!    I spent a long time looking for the "right" background, since I wanted an "updated" DWR.  I had a FQ of a white with black "squiggles" (technical term) that I thought would be ideal.


However, nothing I could find in stores or online approximated what I thought I wanted.  I bought some white fabric with small black dots in case I continued to be unsuccessful.    Then, on our Saturday, Labor Day weekend Fabric Expedition to Berks County, I found this batik with pale gray dots spread out sort of topographically on a white background:


This seemed to be a good alternative and, now that I look at both choices, I much prefer it to the black squiggles.   The layout will be warm color circles intersecting with cool colored ones and four-patches in black and white. So this is what my DWR will look like...

... someday.

Saturday, September 3, 2011

W.I.B.W.O. -- Leader-ender project

In April, I decided that I was ready to start a "leader-ender" project a la Bonnie Hunter.  "Leader-ender" projects integrate sewing the components into the process of doing your "regular" sewing.  I chose the "Bricks and Stepping Stones" pattern from her site since I already had 3.5" x 6.5" "bricks" cut from assorted scraps.  I cut a bunch of 2" squares from scrap white and scrap black and dark strips.   As I sewed along, I sewed one of each to made a two patch, then two two-patches to make a four-patch.

Pressed open the four-patches, and sewed each to a "brick."


Layout alternates the "matchsticks" (as Bonnie calls them) up and down.

Except, now I have a couple of problems:

a. The project is no longer happy being a leader-ender but wants to become a full-fledged quilt top!   Think I'll have to put some time aside to make it happy.

b. I need to choose and cut for another leader-ender pattern!

Thursday, August 25, 2011

W.I.B.W.O. -- "Tube" quilting


A few weeks ago, my friend Pat brought a little flimsy to the Quilt Day at Another Area Church.  She explained that it was made by sewing strips together, and cutting the strip set to make quarter blocks.  She had found instructions on a video and sent me this link.

I was feeling the need for a break from my "to do" project list and wanted to just play with a new process.  So I pulled out a few 2.5" strips (width-of-fabric) and sewed them together as instructed in the video:  sew two strips to each other, press open, then sew the pairs on both sides, right sides together.

(DO watch the video for complete instructions -- I'm just describing the steps in general, as I thought this quick and easy method useful if you needed a simple, smallish quilt relatively quickly.)


You use a ruler with a 90 degree mark to cut the strip set.

  
One strip set makes 8 quarter blocks -- enough pieces for two full blocks:


Pieces can be arranged different ways:


Since two blocks weren't really enough for anything, I pulled four more strips and made another pair of two:


   Then I mixed the two sets together to make four blocks, each with two quarters from each set.  I didn't measure, but I think each block is around 12" square.


Sewed all four blocks together

  
Added two small borders and VOILA!  One small quilt top done! 


I found it necessary to handle the quarters carefully as all the outside edges were bias and I was afraid to stretch them out.   This was fun to make and would be a good use for a jelly roll.   Adding some sashing and/or a bigger border would make it a little larger for a baby quilt.

Think I will try this again.  I have some Kaffe Fassett fabric cuts and a jelly roll that would make 8 or 9 different vivid colored blocks.


Thursday, July 28, 2011

W.I.B.W.O. -- Godson's quilt

My Godson has been a daredevil from birth.   He never crawled.  Instead, he went directly to walking at around 6 months, IIRC.   Before he was a year old, he would pull the kitchen drawers out of the cupboards, making steps to climb up onto the countertop.   Fearless.

Not much of a surprise that, at a young age, he became quite interested in sports.   He played little league baseball and was a gymnast.  And that was just the team sports!   By high school, he was an extreme skateboarder and in-line skater.   His dad would take video footage and post it on Youtube, then send me the link.  I'm not sure how his mother avoided having a heart attack years ago!  

He and his family live in Ohio, where we lived when my daughters were born.   A few years ago, he attended an extreme sports camp near State College, Pennsylvania, so D#2 and I drove west to see him in action and meet up with his parents when they came to pick him up.   My heart was in my throat as I watched him ride,  jump, twist, flip, and land.  


This year he graduated from high school and he's going to study -- wait for it -- high-performance motorsports next year.   Of course, I wanted to make him a quilt as a graduation gift.

I wanted to incorporate the extreme sports into it, so I found several appropriate fabrics.  Nothing quiet and subtle for THIS quilt!     Got these bright skateboarders to start with.


Later I found this panel with a similar theme.  The panel actually repeats all of these "boxes" so there is a pair of each.  The "boxes" are several different sizes. 


I loved this flame-type fabric and thought I'd use it for backing.  The silhouetted skateboarders were a last minute, less vivid (for a change!), addition, but I only had 1/2 a yard. 


BUT, once I had all these great fabrics, the question became how in Heaven was I going to put them together??!??   I got more stalled and stuck with this problem than I've been with a quilt in a long time.   

Finally, I decided to cut the panel into sections, and frame them out to a standard size with some tone-on-tone brights.   The black and gray became a narrow border, separating the center from the border of bright skateboarders.


Since it got bigger than I'd expected (not an uncommon problem for me), my 2 yards of flames weren't enough, so I pieced it with some gold and a couple of fat quarters of race cars.


Daughters and I went to Ohio for his graduation in May.  I took the top with me so he could unwrap it even though I would be bringing it home to finish.  He loved it.  Finished binding and sewed the label on it last weekend and mailed it out early last week.  It arrived a few days later and was pronounced "awesome".

Progress report: Month 6 (October 2019)

1. ... basement -- Continued work on/in it 2. ... sort/discard -- Discarded/gave away 22 5. ... Clean & reorganize garage &...